Photoshop Tutorial

How to Edit Text in a Photoshop Image

Editing text in Photoshop depends on one question: is the text still an editable text layer, or has it already been flattened into the pixels of the image? If the file is a PSD with live text layers, Photoshop is the right place to make the change. If the only file you have is a JPG, PNG, WebP, or screenshot, the job becomes image repair plus replacement text, and an AI image text editor can often be faster.

Editorial illustration showing a Photoshop-style image text editing workflow
A practical workflow starts by identifying whether the text is a live layer or baked into a flat image.

Quick answer

Use Photoshop's Type tool when the wording is still a text layer. If the text is part of a flattened image, select the old wording, remove it with a repair tool such as Content-Aware Fill or Generative Fill, then add matching replacement text. For short edits in finished images, ImageTextEdit can combine removal, background repair, and replacement in a browser workflow.

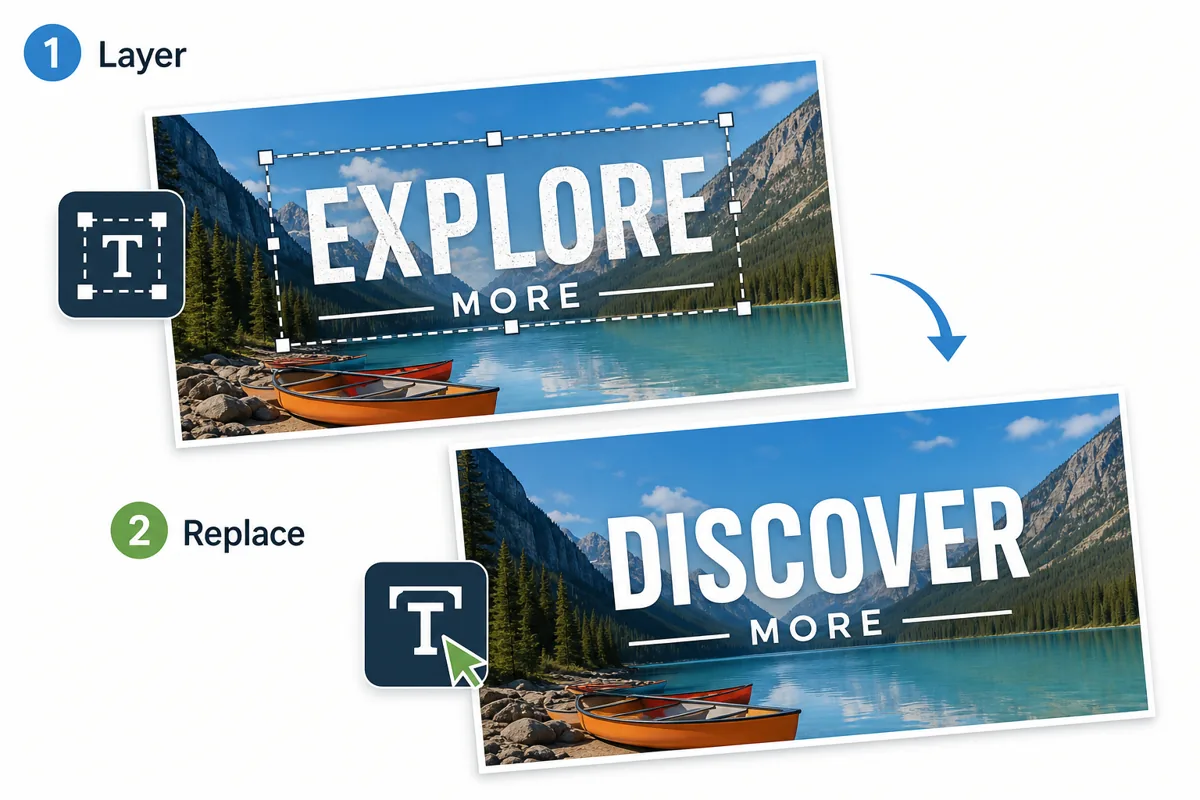
First check whether the text is editable

Many confusing Photoshop tutorials skip this first step. A PSD, TIFF, or layered design file may contain editable text. A downloaded JPG, social graphic, screenshot, or exported product image usually does not. The correct method changes completely once the text is flattened.

What you have Best Photoshop action Best when
Live text layer Select the Type tool, click the text layer, edit the words, then adjust font, tracking, size, and alignment if needed. You have the original PSD or a layered file from the designer.
Flattened JPG or PNG Make a tight selection around the old text, repair the background, and place new text on a separate layer. The words are baked into the image and cannot be clicked as real text.
Screenshot or UI capture Repair only the local text area, keep interface lines and spacing intact, then add short replacement wording. You need to update a label, date, number, user name, or small UI phrase.

Photoshop workflow for flattened image text

Step 1

Duplicate the image layer before editing

Keep the original layer untouched so you can compare the result or recover if the repair looks unnatural. Work on a duplicate layer, especially when the background has shadows, texture, gradients, or small objects near the letters.

Step 2

Select only the old text area

Use a tight rectangular, lasso, or object-style selection around the exact letters you want to change. Avoid selecting more of the background than necessary. A focused selection helps the repair preserve nearby shapes and prevents obvious patches.

Step 3

Repair the background behind the text

Use Content-Aware Fill, Generative Fill, Clone Stamp, Healing Brush, or a manual patch depending on the image. Simple walls, menus, signs, and product labels are easier than complex fabric, faces, reflections, or dense patterns.

Step 4

Add replacement text on a new layer

Create a new text layer and match the original font style as closely as possible. Adjust color, size, spacing, rotation, blur, opacity, and shadow so the new words sit naturally inside the repaired area.

Step 5

Zoom out and check the whole image

A replacement can look correct at 300 percent zoom but strange at normal viewing size. Check alignment, contrast, baseline, edge softness, and whether the new wording is too long for the original layout.

Step 6

Export a clean copy

Save the layered file if you may need future edits, then export a new JPG, PNG, or WebP for publishing. Do not overwrite your only original file.

When an online AI editor is faster than Photoshop

Photoshop gives you control, but it is not always the quickest answer. For many real-world requests, the goal is simply to change one price, date, label, short headline, or screenshot value without rebuilding the entire design.

  • Use ImageTextEdit when the file is already flattened and the replacement is short.
  • Use the same-font editor when preserving the original type style matters more than manual layer control.
  • Use the screenshot workflow for app captures, dashboard labels, account names, dates, and UI text.
  • Use Photoshop when you need detailed art direction, multi-line typography, exact brand fonts, masking, or several layout changes at once.
  • For best results in either workflow, keep the replacement similar in length to the original wording.

Photoshop vs ImageTextEdit for image text changes

Option Use it for Watch out for
Photoshop text layer edit Original PSD files, brand templates, editable posters, and design files with live type. Not useful when the only file is a flattened screenshot or compressed image.
Photoshop repair plus new text Complex backgrounds, precise manual control, exact typography, and professional design cleanup. Can be slow for one-line edits and requires skill to hide patches.
ImageTextEdit online workflow Fast short replacements in finished images, menus, product labels, social graphics, and screenshots. Very long replacement text, tiny blurred letters, or busy textures may need retries or manual cleanup.

Related image text editing workflows

Edit text in an image online

Use the main browser editor when you want to replace baked-in wording without opening Photoshop.

Open editor

Edit text with the same font

Choose this page when the replacement must keep the original font feel, spacing, and visual style.

Open same-font workflow

Edit screenshot text online

Use a screenshot-specific workflow for UI labels, dates, names, and short app-interface text.

Open screenshot editor

Remove text from image

Erase unwanted words and repair the background when you do not need replacement wording.

Remove image text

FAQ

The text is probably not a live text layer. If it came from a JPG, PNG, screenshot, or flattened export, the letters are pixels. You need to remove or repair those pixels and then add new text.

Photoshop can help identify or approximate fonts in some workflows, but exact recovery is not guaranteed. You still need to adjust size, spacing, color, and effects so the new text blends with the image.

It can remove the old letters, but it does not create the replacement wording for you. You still need to add a new text layer and style it. Busy backgrounds may also need manual cleanup.

Use ImageTextEdit when the image is already flattened and you need a short replacement quickly. It is especially useful for menus, signs, labels, screenshots, sale graphics, and product images.

A natural edit uses a tight selection, clean background repair, similar text length, matching color, realistic spacing, and edge softness that fits the original image.

Need to change text in a finished image?

If your file is not a layered Photoshop document, use the online editor to select the old words, enter replacement text, and generate a clean result.